Tie and Dye Techniques
Tie dye is a textile dyeing method that involves twisting‚ folding‚ or crumpling fabric and securing it with strings or rubber bands before applying dye. The result is a beautiful‚ unique pattern of colorful designs that can be applied to various fabrics‚ including cotton‚ silk‚ rayon‚ and more. Tie-dye is a favorite fabric craft for kids and adults of all ages. By using a variety of tying methods‚ you can create interesting patterns with your tie dye. From fun friendship bracelets to cute tie dye flip flops that can easily match your bathing suit‚ these tie dye instructions are great for kids and adults of all ages. You can use any techniques you’d like to create these patterns‚ from easy to advanced.
Introduction
Tie dye‚ a form of resist dyeing‚ is a technique of patterning fabric by tying parts of it in different ways to prevent the penetration of dyes. The tied areas resist the dye‚ resulting in unique and colorful designs. Tie dye has been practiced for centuries‚ with origins in various cultures around the world. The process involves folding‚ twisting‚ or crumpling the fabric and securing it with rubber bands‚ strings‚ or other materials. Once the fabric is tied‚ dye is applied‚ and the tied areas remain undyed. After the dye has set‚ the ties are removed‚ revealing the intricate patterns.
Tie and Dye⁚ A Textile Dyeing Method
Tie-dye is a resist-dyeing process for creating attractive colored designs on fabrics. This is achieved by knotting‚ binding‚ folding or sewing certain parts of the cloth in such a way that the dye cannot penetrate into these areas when the cloth is dyed. The technique involves tying‚ folding‚ or twisting fabric to create patterns and then applying dye to the fabric. The areas that are tied‚ folded‚ or twisted will resist the dye‚ creating the unique tie-dye designs. The process is known for its creative freedom‚ allowing for endless possibilities in patterns and color combinations. Tie dye can be used to create a variety of designs‚ from simple and geometric to complex and intricate. It is a popular technique for creating personalized clothing‚ accessories‚ and home decor.
Basic Tie Dye Instructions
This tutorial will cover the basics of tie-dye⁚ how to prep‚ tie‚ dye‚ and wash tie-dyed garments. I’ll share the best and brightest types of dye to buy‚ as well as all the other supplies you’ll need. To get you started‚ I’ve curated some of the easiest tie-dye patterns and techniques. With pictures and step-by-step instructions‚ I’ll show you how to create a multitude of unique and interesting tie-dye designs. Included in this book are fifteen different tie dye designs and nine tie dye patterns. Read through the techniques first‚ and then try out your new skills by making one of the projects we’ve included in the eBook. Our step-by-step tie dye instructions include everything you need to know to complete your tie dye project. Choose from one of our many tie dye designs and get started!
Preparation
Before you start tie-dyeing‚ you’ll need to gather your supplies and prepare your workspace. You’ll need a few basic items‚ including⁚
- Fabric⁚ Choose a natural fiber fabric like cotton‚ silk‚ or rayon. These fabrics absorb dye well and create vibrant colors.
- Rubber bands⁚ These will be used to tie and bind the fabric‚ creating the resist patterns.
- Tie dye kit⁚ These kits typically include dye‚ gloves‚ and instructions.
- Plastic sheeting⁚ This will protect your workspace from spills and stains.
- Gloves⁚ Protect your hands from the dye.
- Plastic bowl or container⁚ This will be used to mix the dye.
- Water⁚ You’ll need water for mixing the dye and rinsing the fabric.
- Salt⁚ This helps to set the dye and make it more permanent.
- Vinegar⁚ This helps to neutralize the dye and prevent fading.
Once you have all of your supplies‚ you can start prepping your fabric. First‚ soak the fabric in water for at least 30 minutes to make sure it’s completely saturated. This will help the dye to penetrate the fabric evenly.
Tying the Fabric
Tying the fabric is the most crucial part of the tie-dye process‚ as it determines the final pattern. There are countless ways to tie fabric‚ each resulting in a unique design. Some common techniques include⁚
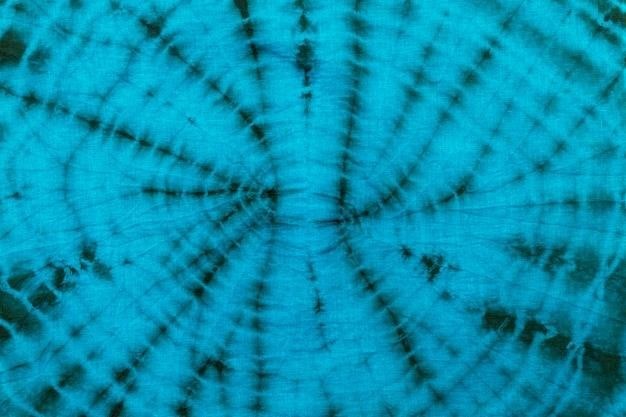
- Spiral⁚ Pinch the fabric in the center and twist it into a tight spiral. Secure the spiral with rubber bands at regular intervals. This technique creates circular patterns with radiating lines.
- Crumple⁚ Simply scrunch the fabric into a ball and secure it with rubber bands. This technique results in a random and unpredictable pattern.
- Accordion Fold⁚ Fold the fabric back and forth in a series of even pleats. Secure the folds with rubber bands. This technique creates sharp‚ defined stripes or geometric patterns.
- Knot⁚ Tie knots in the fabric using string or rubber bands. This technique creates small‚ concentrated areas of color.
- Rosette⁚ Fold the fabric into a fan shape and secure it with rubber bands at the base and center. This technique creates a flower-like pattern.
Experiment with different tying techniques and combinations to create your own unique designs. Be creative and have fun!
Dyeing
Once your fabric is tied‚ it’s time to apply the dye. It’s essential to work in a well-ventilated area‚ as dye fumes can be harmful. You’ll need a pair of gloves‚ a plastic container for mixing dye‚ and a brush or sponge for applying it. Before you begin‚ wet the fabric thoroughly with water; This helps the dye to penetrate the fibers evenly.
Now‚ mix the dye according to the manufacturer’s instructions. Start with a small amount of dye and add more as needed. Apply the dye generously to the fabric‚ ensuring that all areas are covered. You can use different colors for a multi-colored design. Allow the dye to sit for the amount of time specified by the manufacturer. This is usually between 30 minutes and several hours. After the dye has set‚ rinse the fabric thoroughly with cold water until the water runs clear. This removes excess dye and prevents bleeding.
Washing
Once the fabric is rinsed‚ it’s time to wash it. The best way to wash tie-dye is in a washing machine with cold water. Add a mild detergent and wash on a gentle cycle. Avoid using bleach or fabric softener as they can damage the dye. After washing‚ rinse the fabric thoroughly with cold water again. Finally‚ dry the fabric in a dryer on a low heat setting or hang it to air dry.
It’s important to wash tie-dye separately from other laundry items for the first few washes‚ as the dye can bleed and stain. Once the dye has set‚ you can wash tie-dye with other laundry items. The dye should be set after the first wash‚ but it’s a good idea to wash tie-dye separately for the first few washes to be safe. After washing‚ you’ll have a beautiful‚ unique tie-dye creation that you can wear or display with pride.
Easy Tie Dye Patterns
Tie dye patterns are a great way to express your creativity. There are endless possibilities when it comes to tie dye patterns. From simple to complex‚ there’s a tie dye pattern for everyone. If you’re looking for some easy tie dye patterns to get you started‚ here are a few ideas.
The spiral tie dye pattern is a classic and easy-to-create pattern. To create a spiral tie dye‚ simply twist the fabric into a spiral shape and secure it with rubber bands. The circles tie dye pattern is another simple and popular pattern. To create a circles tie dye pattern‚ fold the fabric into a circle shape and secure it with rubber bands. The stripes tie dye pattern is a great way to add a touch of color to your wardrobe. To create a stripes tie dye pattern‚ fold the fabric into a series of stripes and secure it with rubber bands.
Spiral Tie Dye
The spiral tie dye pattern is one of the most popular and easiest tie dye patterns to create. To create a spiral tie dye pattern‚ simply twist the fabric into a spiral shape and secure it with rubber bands. The tighter the spiral‚ the more defined the pattern will be. You can create a variety of spiral tie dye patterns by experimenting with different numbers of rubber bands and different twisting techniques. Once you’ve secured the fabric with rubber bands‚ apply the dye to the fabric. Make sure to apply the dye evenly to the fabric to create a consistent spiral pattern.
You can use one or multiple colors to create a spiral tie dye pattern. If you’re using multiple colors‚ apply the dye to the fabric in sections. For example‚ you could apply one color to the center of the spiral‚ another color to the middle of the spiral‚ and a third color to the outside of the spiral. Once you’ve applied the dye‚ let the fabric sit for at least 24 hours to allow the dye to set. After the dye has set‚ remove the rubber bands and wash the fabric in cold water.
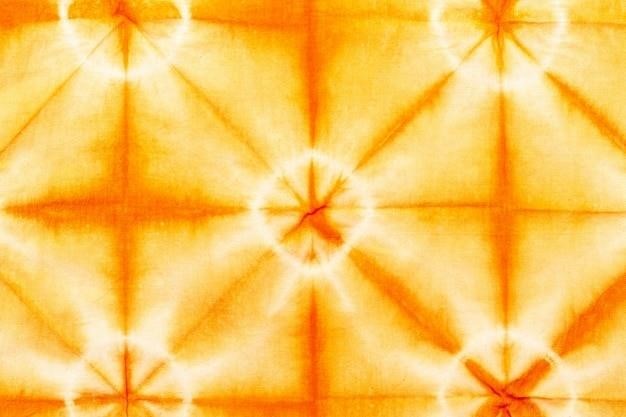
Circles Tie Dye
Circles tie dye is a fun and easy tie dye pattern that is perfect for beginners. To create a circles tie dye pattern‚ simply fold the fabric in half and then in half again to create a square shape. Once you’ve folded the fabric‚ use rubber bands to create circles on the fabric. You can create different sized circles by using different sized rubber bands. The tighter the rubber bands‚ the smaller the circles will be. Once you’ve secured the fabric with rubber bands‚ apply the dye to the fabric. Make sure to apply the dye evenly to the fabric to create a consistent circles pattern. You can use one or multiple colors to create a circles tie dye pattern.
If you’re using multiple colors‚ apply the dye to the fabric in sections. For example‚ you could apply one color to the center of the fabric‚ another color to the middle of the fabric‚ and a third color to the outside of the fabric. Once you’ve applied the dye‚ let the fabric sit for at least 24 hours to allow the dye to set. After the dye has set‚ remove the rubber bands and wash the fabric in cold water.
Stripes Tie Dye
Stripes tie dye is a classic and easy tie dye pattern that can be achieved with a few simple steps. To create stripes tie dye‚ simply fold your fabric lengthwise and then use rubber bands to section off the fabric into equal-sized strips. The number of rubber bands you use will determine the number of stripes you create. For example‚ if you use three rubber bands‚ you will create four stripes. Once you have your fabric sectioned off‚ apply your dye to each section. The color of each stripe will be determined by the color of the dye you apply. For a more vibrant look‚ you can use different colors for each stripe. Make sure to apply the dye evenly to each section to create a consistent stripe pattern. Once you’ve applied the dye‚ let the fabric sit for at least 24 hours to allow the dye to set. After the dye has set‚ remove the rubber bands and wash the fabric in cold water.
Hearts Tie Dye
Hearts tie dye is a fun and easy pattern that can be created with a few simple steps. To create hearts tie dye‚ simply fold your fabric in half and then use rubber bands to create a heart shape. You can create a heart shape by folding the fabric into a triangle and then securing the bottom point of the triangle with a rubber band. You can then create the heart shape by folding the fabric in half again and securing the top point of the triangle with another rubber band. Once you have your heart shape created‚ apply your dye to the fabric. Make sure to apply the dye evenly to the entire heart shape to create a consistent pattern. Once you’ve applied the dye‚ let the fabric sit for at least 24 hours to allow the dye to set. After the dye has set‚ remove the rubber bands and wash the fabric in cold water.
Advanced Tie Dye Techniques
Once you’ve mastered the basics of tie-dye‚ you can start experimenting with some more advanced techniques. These techniques require a little more practice‚ but they can produce some truly stunning results. Some advanced tie dye techniques include crumple tie-dye‚ mandala tie-dye‚ and shibori tie-dye. Crumple tie-dye is a technique that involves crumpling the fabric up before applying the dye. This creates a more random and abstract pattern. Mandala tie-dye is a technique that involves creating a circular pattern using rubber bands or string. This technique can be used to create intricate and beautiful designs. Shibori tie-dye is a traditional Japanese technique that involves using stitching‚ folding‚ twisting‚ pleating‚ or crumpling fabric or a garment and binding with string or rubber bands‚ or even clamps which is followed by dyeing. The result is a beautiful‚ unique pattern of colorful designs that can be applied to various fabrics‚ including cotton‚ silk‚ rayon‚ and more.
Crumple Tie-Dye
No twisting‚ folding or pleating needed for this super easy tie-dye technique; just straight up scrunching! All you need to get started is an item to tie dye and your favorite Tulip One-Step Tie-Dye Kit! Simply crumple your fabric into a tight ball‚ using your hands to scrunch it up as much as you can. Once you have the fabric scrunched up‚ secure it with rubber bands. Make sure the rubber bands are tight enough so that the dye doesn’t bleed through. Once you have your fabric secured‚ you can start applying the dye. Apply the dye in a random pattern‚ making sure to cover the entire fabric. Let the dye sit for at least 24 hours‚ then rinse the fabric under cold water until the water runs clear. You can then wash the fabric in a washing machine with a mild detergent.
Mandala Tie-Dye
Learn two ways to do this super fun technique! Your Tulip One-Step Tie-Dye Kit always comes with the basic tie-dye essentials you’ll need for your tie-dye project. The first method is to fold your fabric into a circle and then tie it in the middle with rubber bands. This will create a circular pattern with a center that is darker than the outside. The second method is to tie rubber bands around the fabric in a spiral pattern. This will create a spiral pattern with alternating colors. Once you have your fabric tied‚ you can start applying the dye. Apply the dye in a random pattern‚ making sure to cover the entire fabric. Let the dye sit for at least 24 hours‚ then rinse the fabric under cold water until the water runs clear. You can then wash the fabric in a washing machine with a mild detergent.